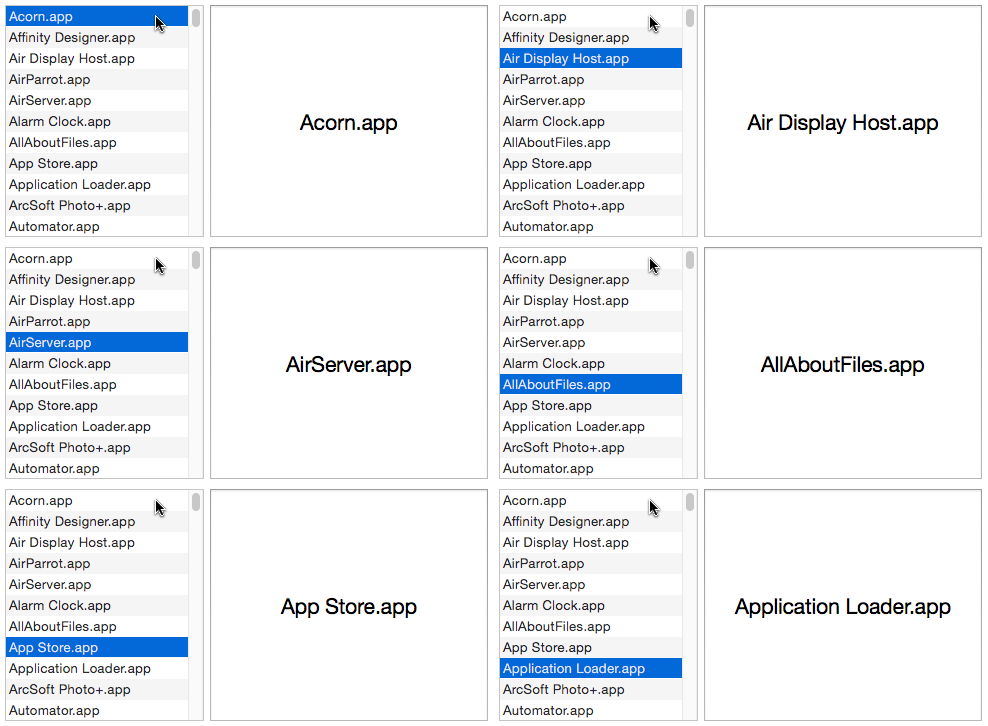
A Text List Object normally has one or more selected items. An item in the list is selected by clicking on it.
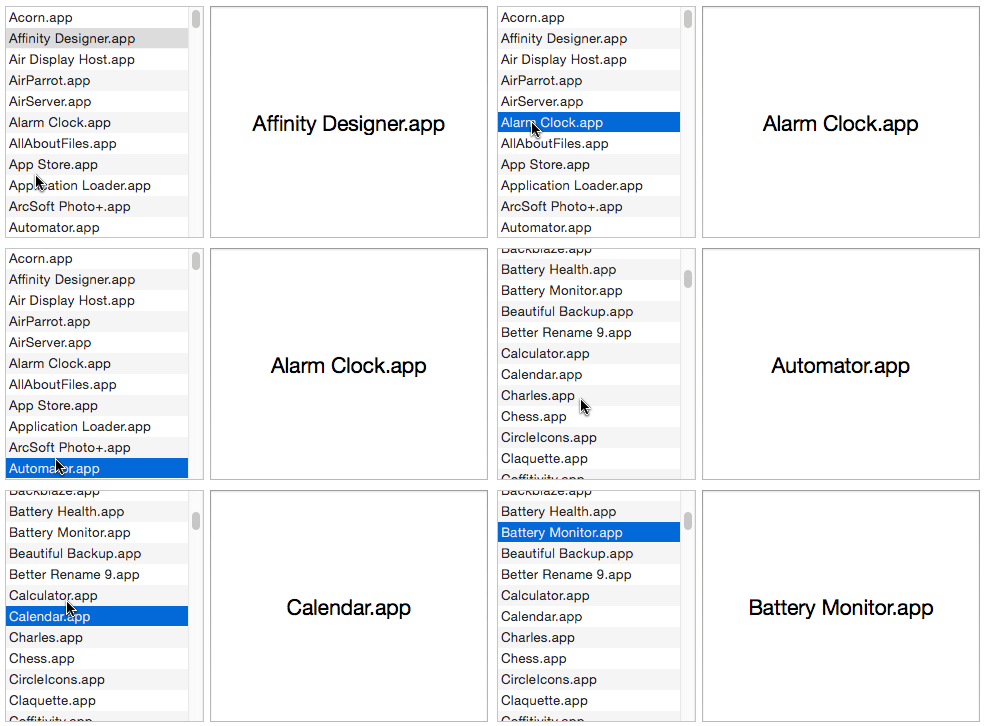
The Text List Object uses a field or variable to keep track of what item (or items) are selected. Unless you are using the Database Navigator option (see Text List Database Integration) you must set up this field or variable before you use the Text List Object. Simply type the name of the field or variable into the Value box in the Text List Options panel. (For a field, you can choose it from the pop-up menu instead of typing it.)
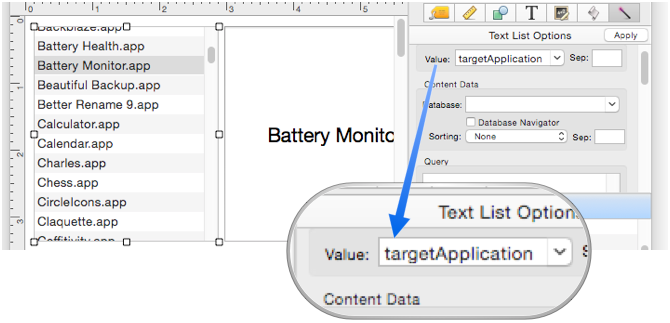
If you specify a variable that has not already been created with a procedure, Panorama will automatically create a fileglobal variable with this name the first time the form is displayed. In the example above, a fileglobal variable named targetApplication will be created and linked to the Text List.
Once this field or variable is set up, you can use it elsewhere to access the selected item value, for example in a program or in another object. In this example, a Text Display Object has been set up that displays the value of the targetApplication variable.
If you go back to the top of the page, you can see how the application name is displayed as different applications in the list are clicked.
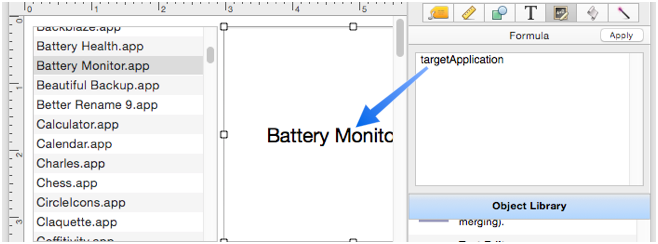
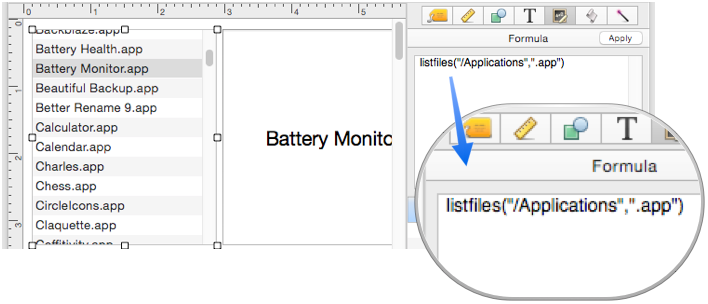
By the way, this list of applications was created with a simple formula using the listfiles( function. By changing the formula, you can display a list of any data you want. See Text List Object to learn more about setting up the formula to display the data you want to list.
Selecting Multiple Items in the List
Normally only one item in the list can be selected at a time. However, if the Allow Multiple Rows option is checked, multiple items can be selected at once. There is also an option to allow no rows to be selected (otherwise there has to be at least one selected item at all times).
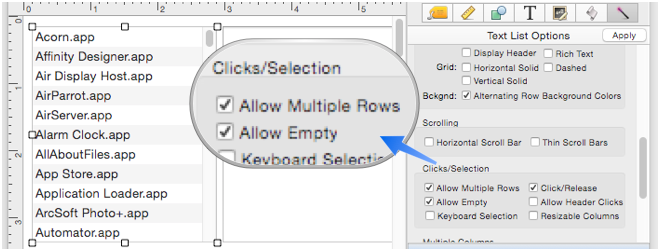
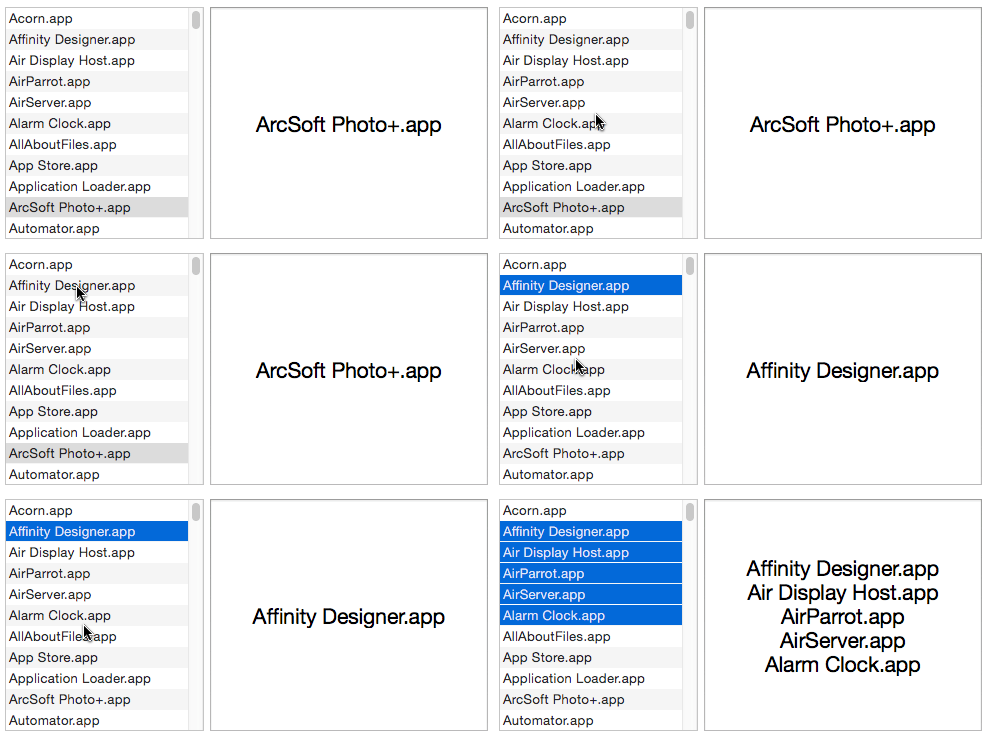
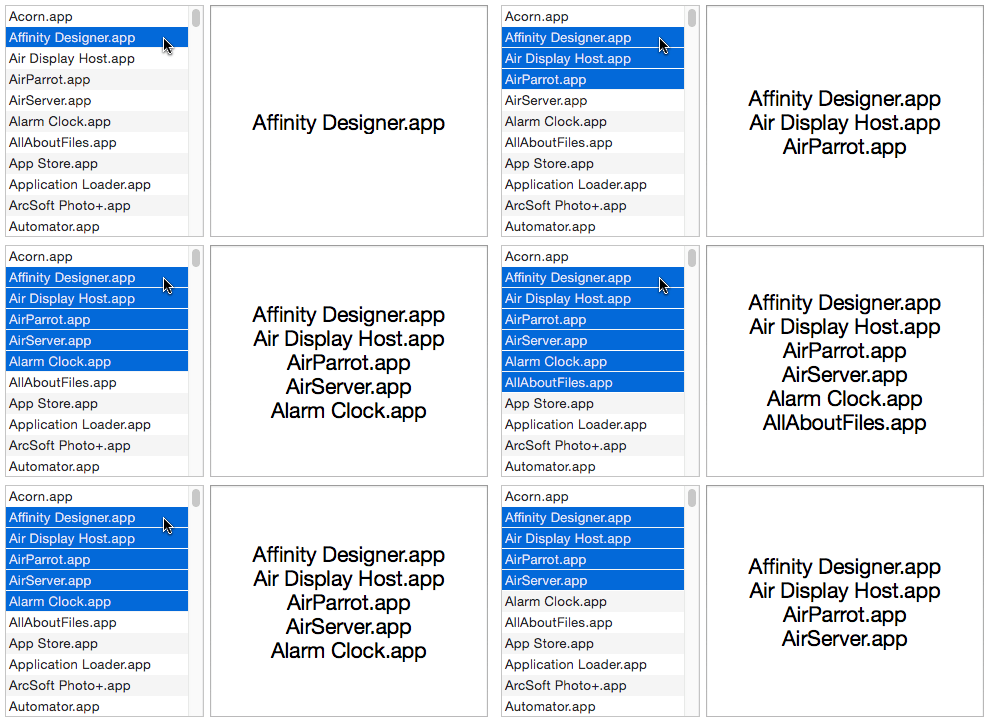
Once the Allow Multiple Rows option is checked, there are two ways to select multiple items. If you want to select a continguous section of items, click the first item, then hold down the SHIFT key and click on the second item. Both items and all the items in between will be selected.
If you want to select a random selection of items, click the first item, then hold down the COMMAND key as you click on each additional item. (If you want to start over, release the COMMAND key and click.)
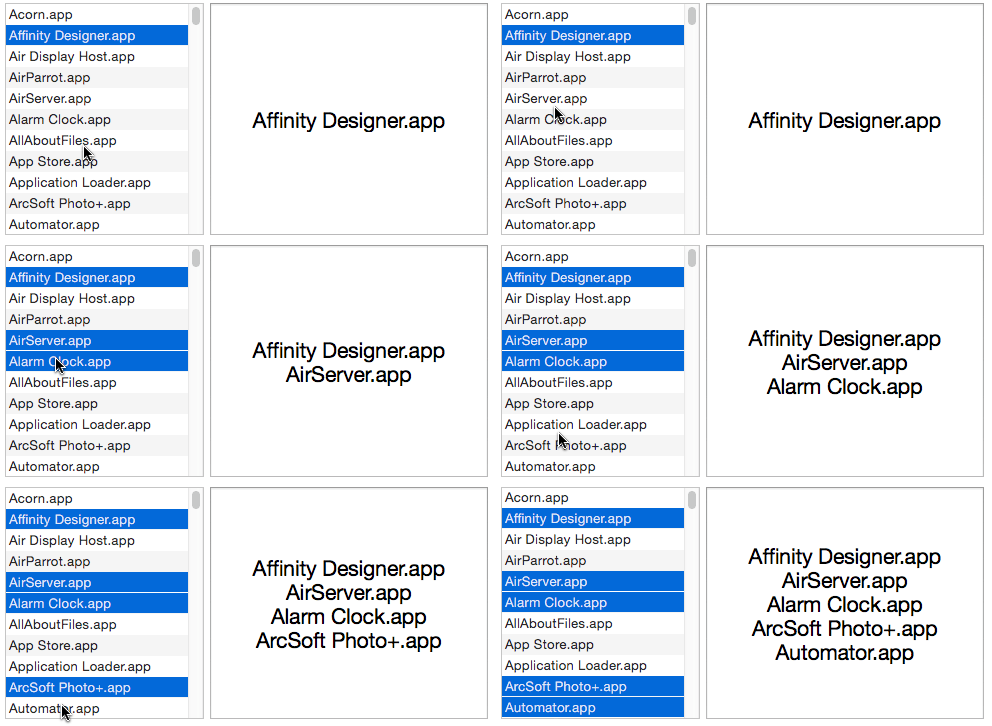
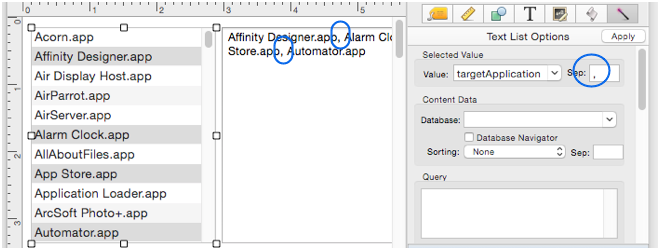
As you can see in the examples above, when more than one item is selected, all of the selected items are included in the field or variable that is linked to the Text List Object (see the first section above). By default, each item is listed on its own line, separated by carriage returns. However, you can change the separator to something else, in this example the separator has been changed to comma+space (the Text Display font size and alignment were also changed).
Note: If the ‘Database Navigator’ is being used, you will not be able to select multiple items at one time.
Selecting Text List Items with the Keyboard
Once you’ve clicked on an item in a list, you can use the up and down arrow keys to move the selection up and down. In this example, the down arrow key is used to move the the selection down the list. Notice that the mouse arrow isn’t moving – there is no clicking, only the keyboard is being used to move the selection.
If you’ve enabled selection of multiple rows (see previous section), you can hold down the SHIFT key with the arrows key to select multiple items.
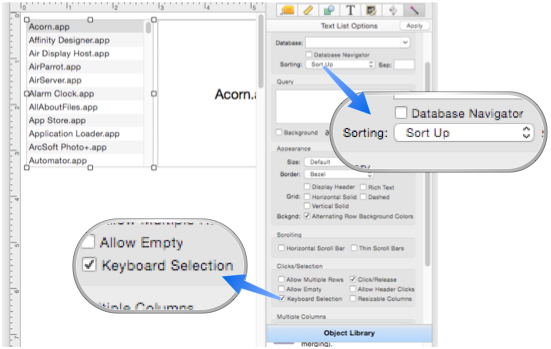
Another option is Keyboard Selection. This only works properly if the list is sorted, so if your data isn’t already sorted, choose the Sort Up option.
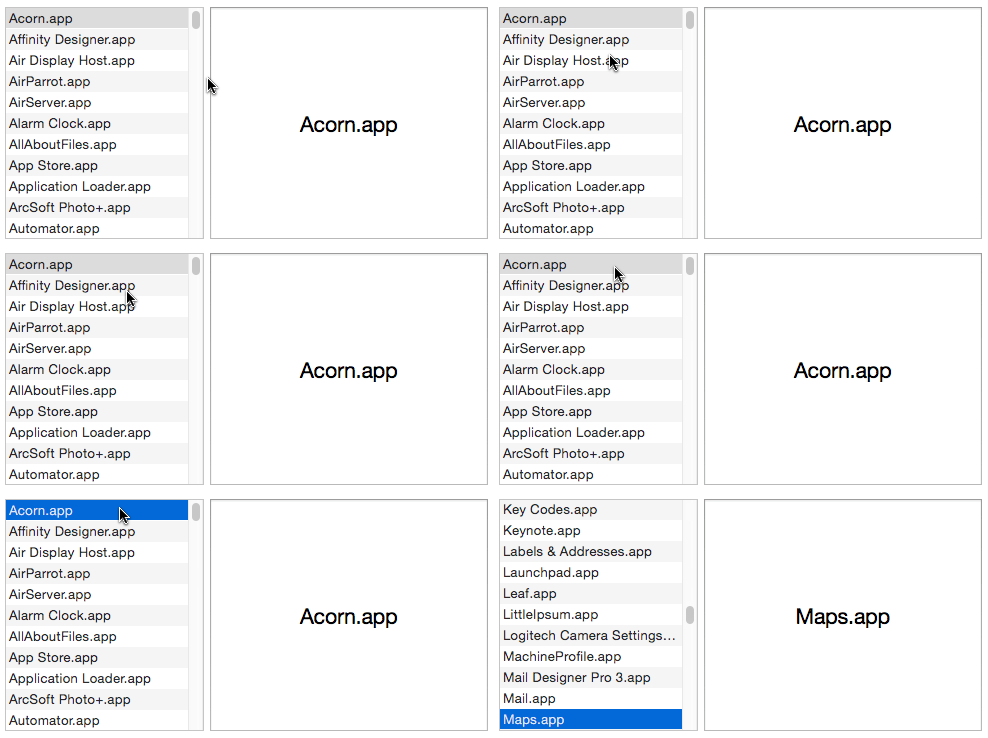
With this option enabled, I can jump to a list item by pressing letters on the keyboard (you must click on the list first to tell Panorama to focus on it). This movie below shows the following steps:
- Click on the list (any item)
- Press the M key
- Press the A key
- Press the P key
Pressing these keys causes the list to jump to the Maps.app item.
Programming the List Selection
The selected item can be accessed or even modified in a program. To access the selected item value, simply include the field or variable name in the program (or any formula). In this example, a button has been created that launches the application selected in the list. (See Font Awesome Icons to learn how to create a button like this.)
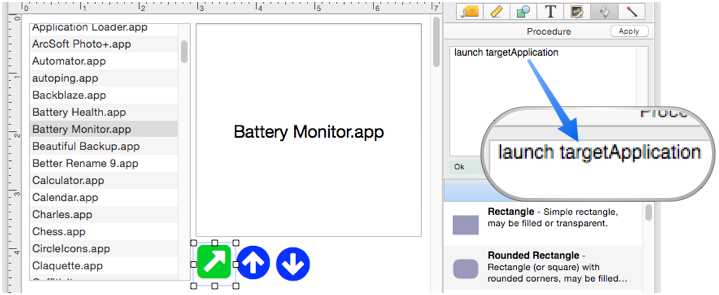
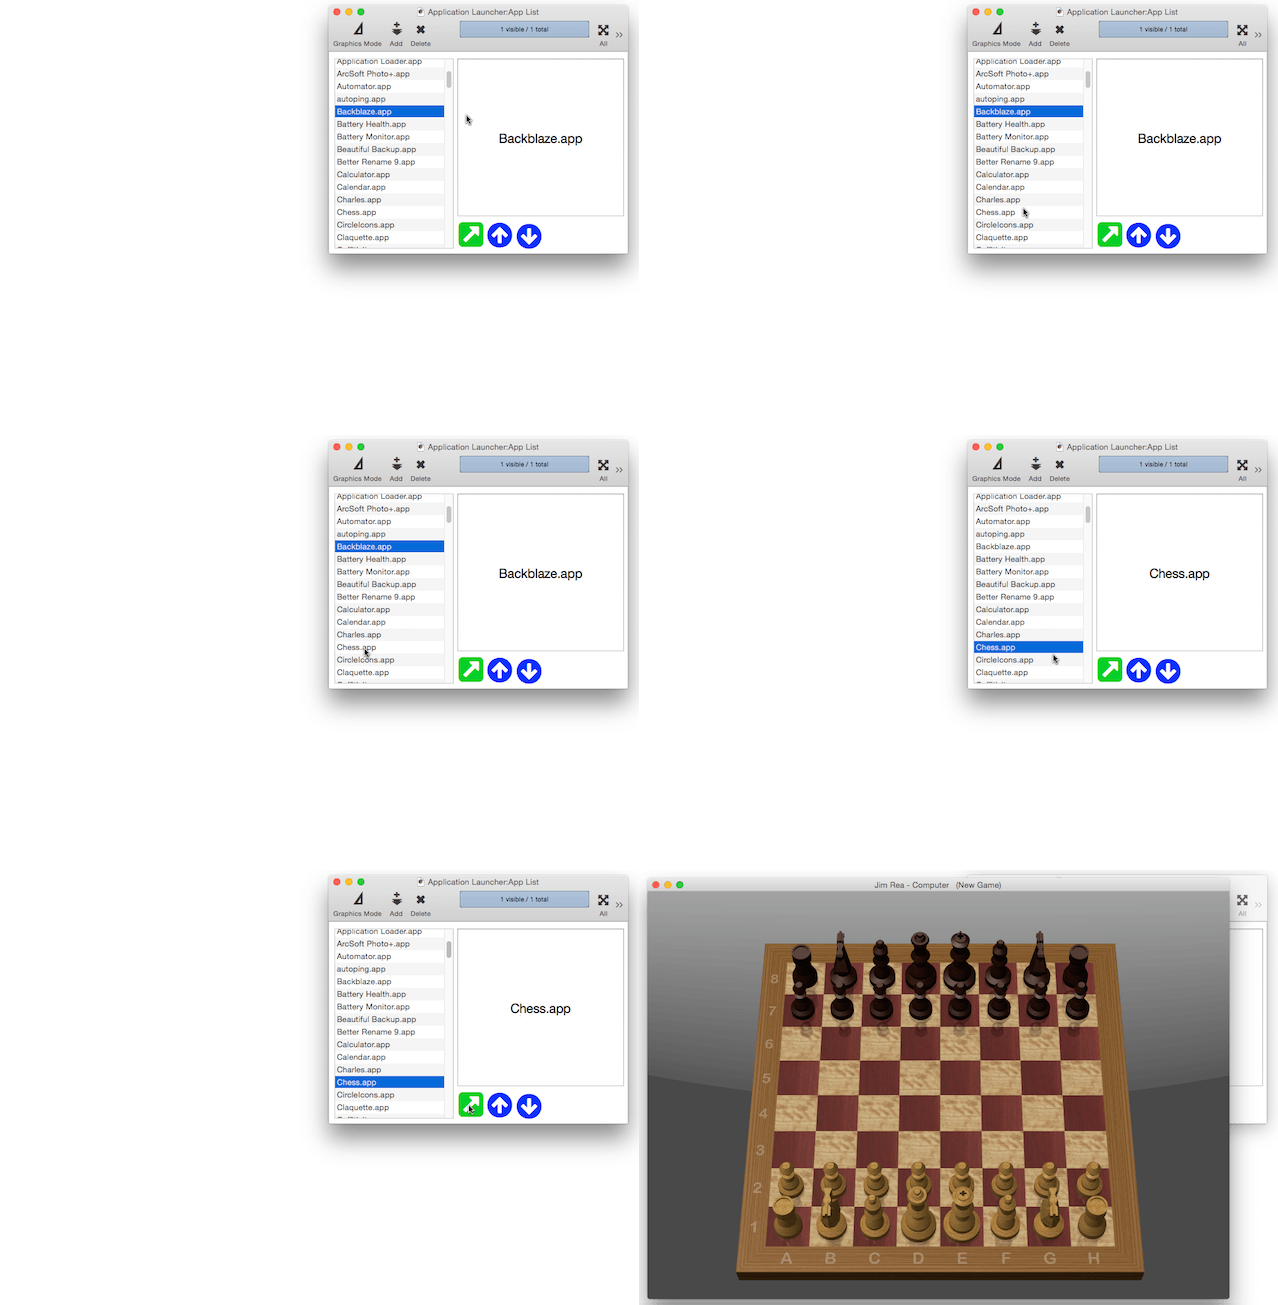
With this simple button and procedure, I can select any application in the list and then launch it. (Of course launching an application is not a typical use of a Text List Object in a database. More typical would be viewing more detailed information associated with the list item, but this does provide a simple illustration of how to access the selected list item.)
To modify the selected list item, simply assign a new value to it. If the list is linked to a variable instead of a field, the code must also use the showvariables statement to update the display of the variable. To illustrate this, this database has an Action Menu with four procedures set up to jump to specific favorite applications.
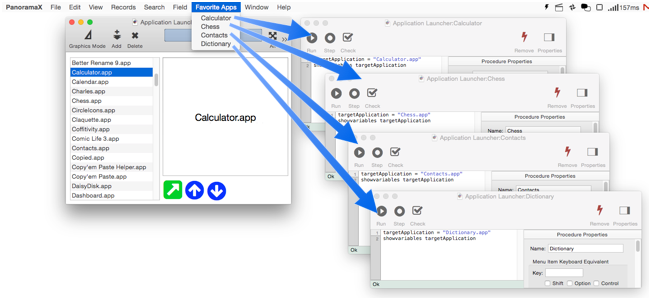
Each procedure is simple – the desired value is assigned to the variable, then the showvariables statement is used to update the display.

Now these items in the Action Menu can be used to quickly jump to any of the favorite applications that have been set up.
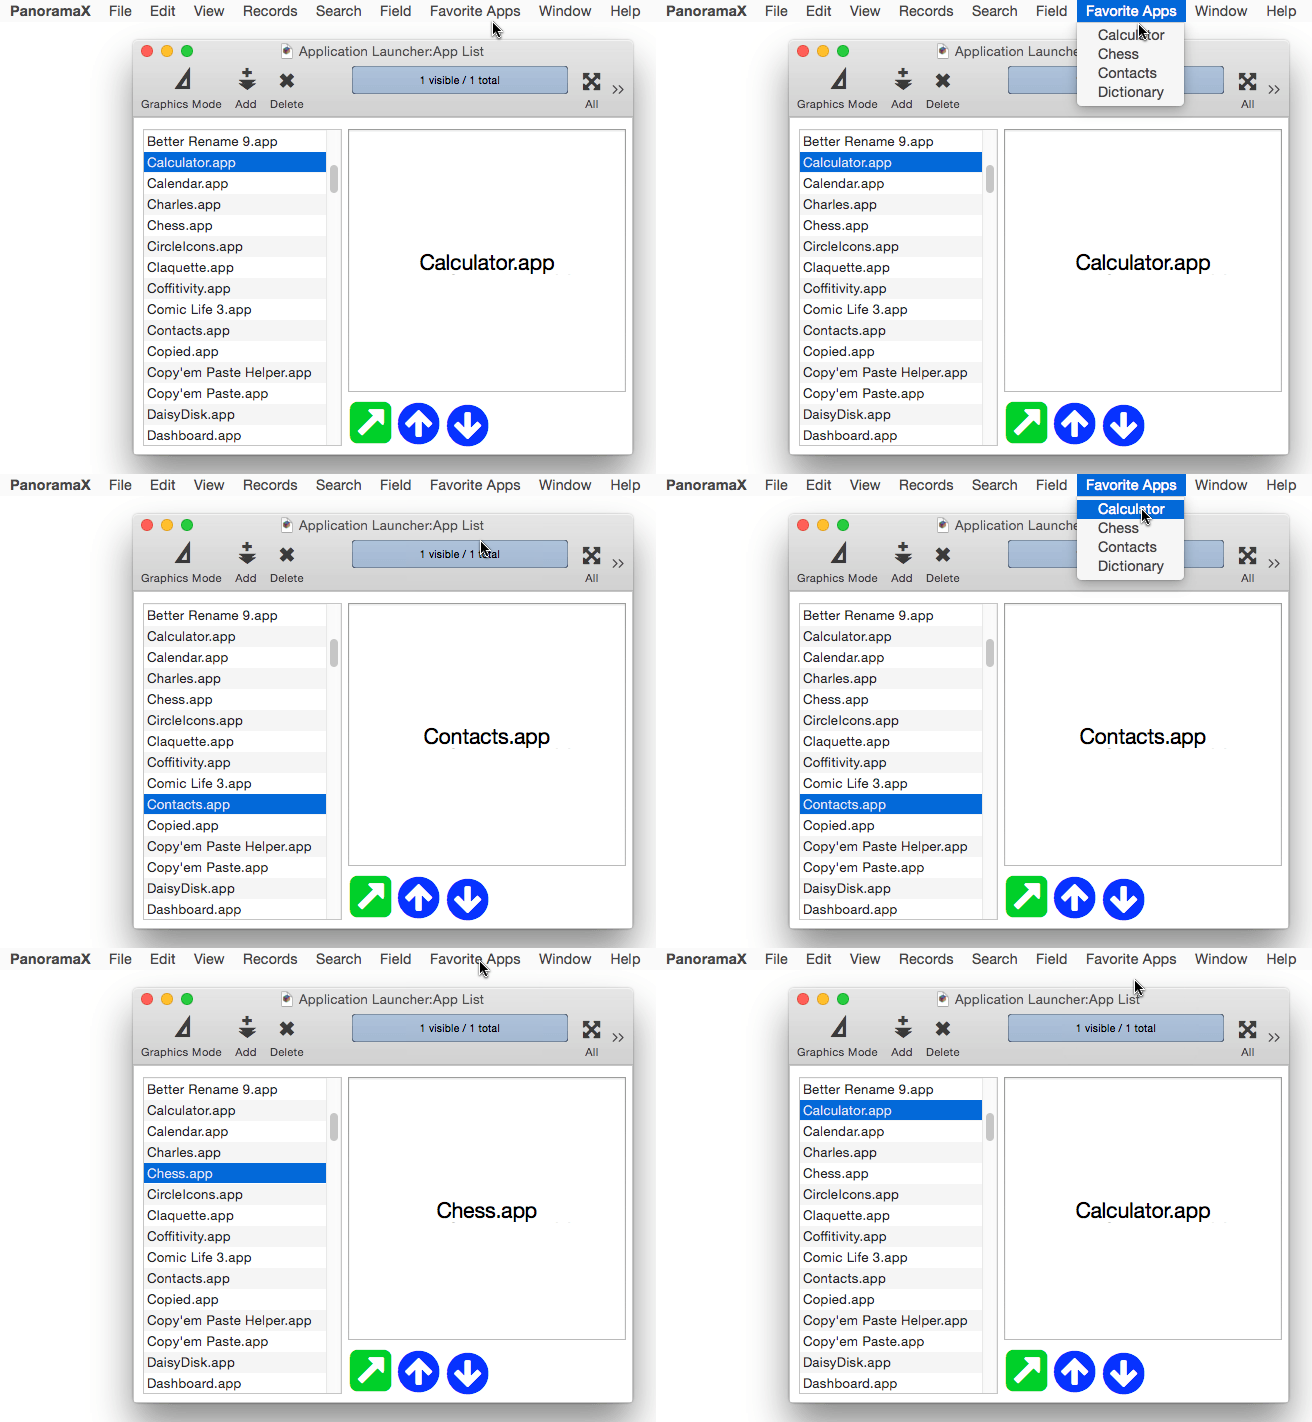
The up and down arrow icon buttons have been programmed for a slightly more complex illustration of modifying the selected item with a program. These have been programmed to move the selected item up and down (much like pressing the up and down arrows on the keyboard). Before examining the program code, let’s see how these buttons work in action.
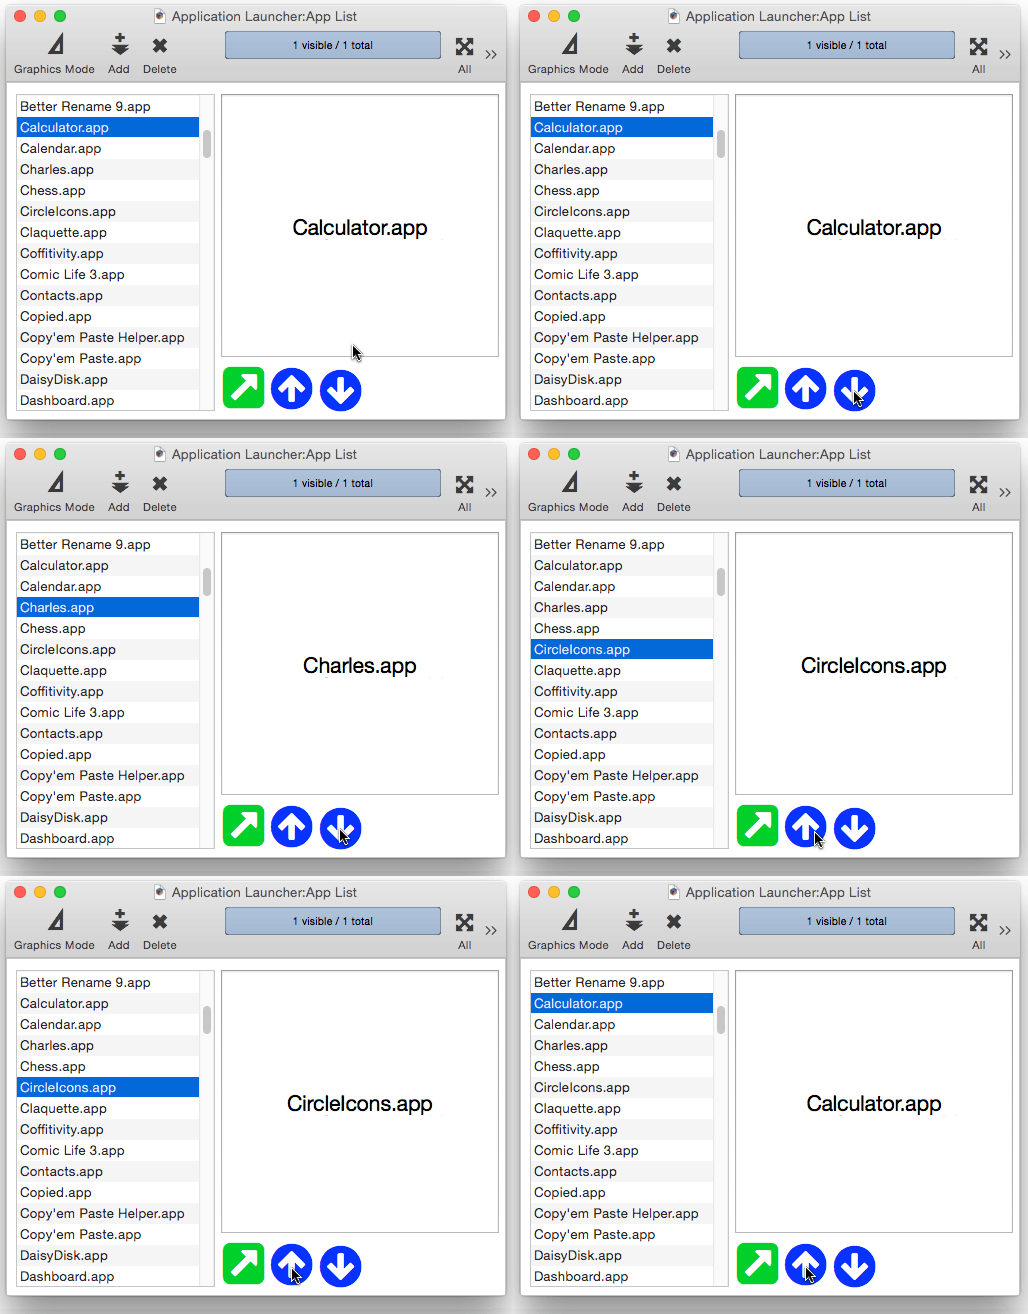
Here is the code for the down arrow button.
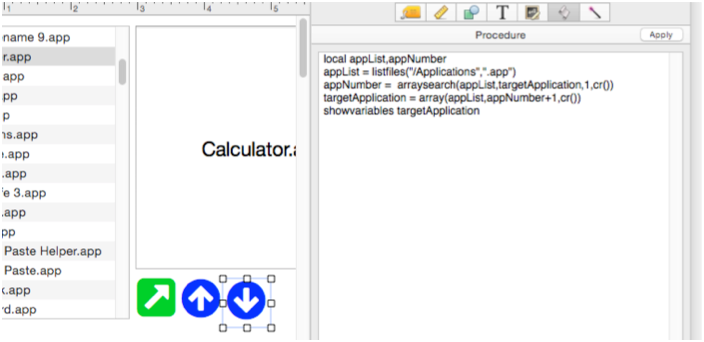
The first two lines set up the variables and collects the list of items displayed in the list (in this case the list of applications, using the same formula that was used in the Text List Object itself.
local appList,appNumber
appList = listfiles("/Applications",".app")
The third line calculates what the item number is of the currently selected item – 1 is the topmost item, 2 is the second item, etc.
appNumber = arraysearch(appList,targetApplication,1,cr())
The fourth line calculates the value of the next item in the list, and assigns that to the variable that is linked to the list’s selected value.
targetApplication = array(appList,appNumber+1,cr())
The final line updates the display of the targetApplication variable, which makes the change in the selected item visible.
showvariables targetApplication
The code for the up arrow button is the same, except that in the fourth line, instead of
appNumber+1
it uses
appNumber-1
so that the selection will move to the previous item.
See Also
- Displaying Data in a Grid -- fundamentals of displaying data in a grid (Text List/Matrix).
- Matrix Clicking -- handling clicks in a Matrix Object.
- Matrix Constructor -- quickly creating a Matrix Object from a template.
- Matrix Database Integration -- synchronizing a Matrix Object with a database.
- Matrix Geometry -- customizing the size and geometry of Matrix Object elements.
- Matrix Header and Horizontal Scrolling -- setting up a custom header for a Matrix Object grid.
- Matrix Object -- displaying a grid of items with a custom arrangement.
- Matrix Object Frame -- setting up the arrangement of items within a Matrix Object.
- Matrix Programming -- programming a Matrix object.
- Text List Appearance -- customizing the appearance of a Text List Object.
- Text List Constructor -- quickly creating a Text List Object from a template.
- Text List Database Integration -- synchronizing a Text List Object with a database.
- Text List Multiple Columns -- displaying multiple columns in a Text List Object
- Text List Object -- displaying a grid of text.
- Text List Programming -- programming a Text List Object.
- Text List Searching -- searching within a Text List Object.
History
| Version | Status | Notes |
| 10.0 | New | New in this version. |