The playsound statement starts playing a sound file.
Parameters
This statement has three parameters:file – specifies the path and filename for the sound to be played, including the extension (common extensions for sound files include .aif, .aiff, .mp3 and .wav.
property – an optional sound property. See below for detailed descriptions of the different sound properties that can be specified. Properties can be specified in either upper or lower case, for example LOOPING or looping.
value – the value for the property specified by the previous parameter.
Description
This statement starts playing a sound file (audio). In its simplest form, you simply specify the path and name of the file to be played.
playsound "~/Sounds/Big Ben Chime.aiff"
The procedure doesn’t wait for the sound to finish playing. The specified sound will be played in the background. The sound duration could be one second or it could be five hours, it doesn’t matter – once the sound is started it will continue to play while you perform other tasks. In the example above the chimes will continue to play until they finish – you can’t pause or stop them.
Controlling a Sound
You may wish to control a sound after it has started playing. For example you might want to pause or stop the sound, or skip ahead or back. To be able to do that, you must give the sound an identifier. In this example, the identifier has been specified as Chimes.
playsound "~/Sounds/Big Ben Chime.aiff","IDENTIFIER","Chimes"
When a sound has an identifier you can use the controlsound statement to control the sound while it is playing. For example, you could use this code to stop the chimes before they have finished.
controlsound "Chimes","stop"
Note: The identifier is only valid while the sound is playing. Once the sound has finished playing (or you have stopped it), the sound no longer exists – you can no longer control it. See the controlsound statement to lean more about controlling a sound while it is playing.
Sound Properties
When you play a sound you can specify one or more optional properties – whether the sound loops over and over, the volume, and any code that you want to run when the sound finished. Wnen you start the sound, you can specify all the properties you need, like this:
playsound soundfile,property1,value1,property2,value2,property3,value3
Most properties have a default value – for example the default volume is 1 (maximum volume).
Identifier
If you want to be able to control a sound after it starts playing, you must specify an identifier for the sound. This identifier must be unique while the sound is playing. It’s ok to use the same identifier more than once, as long as it is only used for one sound at a time. The examples earlier on the page show how the identifier property is used.
Looping
Usually a sound is played once and then finishes, but if the looping property is true then the sound will be played over and over again. If you use this option, be sure to also set up an identifier – if you don’t, the only way to stop the sound will be to quit Panorama. Here’s an example that causes a chirping sound to be played over and over again for 10 seconds.
playsound "~/Sounds/Chirp.aiff","IDENTIFIER","Chirp","LOOPING","YES"
wait 10
controlsound "Chirp","stop"
Note that you can do other things while the sound is playing – even click on other windows or run other procedures. (However, if you perform a slow operation, the chirp sound may continue to play for more than 10 seconds.)
Volume
Usually a sound is played at maximum volume based on the overall volume settings for your computer. You can, however, play a sound at a relatively reduced volume. The volume is specified from 0 (muted) to 1 (full volume according to your computer volume settings). For example, this code plays the chimes at half volume.
playsound "~/Sounds/Big Ben Chime.aiff","VOLUME",0.5
Code
Use this property to define the code that will run when the sound stops playing (either because it has finished or because you stopped it). This property is text, so you’ll need to quote the entire thing with alternate quote characters, for example brackets or pipes.
playsound "~/Sounds/Big Ben Chime.aiff","code",{nsnotify "chime finished"}
You use any kind of code here, but you should generally keep the code as minimal as possible. If the code takes too long to run, it could interfere with normal Panorama usage. You normally wouldn’t want the code to do anything that affects the user’s use of Panorama. For example, it’s usually not a good idea to have a window suddenly open or close for no apparent reason.
By default, you cannot rely on Panorama being in a certain state when the code begins. For example, you should not rely on a particular window or database being active when the sound finishes. In fact, the database that started playing the sound might not even be open by the time the sound finishes playing. So make sure you code defensively and check the state before you perform any action that depends on that state.
Example Sound Application
To illustrate the operation of the the playsound statement and related features, here is a simple application that demonstrates how sounds can be used in Panorama. Here’s what the database looks like.
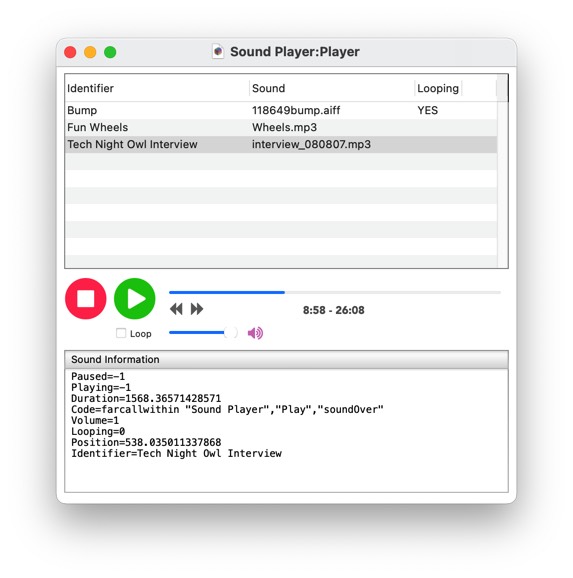
The database is in a folder that contains a Sounds folder. All of the sounds are stored in this folder. (It doesn’t have to be done this way, sounds can be anywhere, but this database was designed to look for the sounds there.)
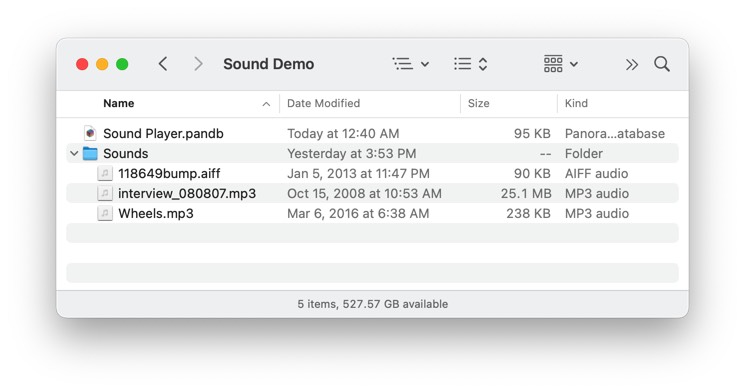
The database has 3 fields. The Identifier field contains a unique identifier assigned to each sound. In this case we could have used the sound file name as the identifier, but for the purposes of this demonstration the identifier was kept separate.
The Sound field contains the name of the sound file. In this example all of the sound files are placed in the Sounds folder, so only the filename is needed, not the complete path. But you could set up the database so that the complete path is stored, allowing sounds anywhere on the disk to be used.
The Looping field is set to YES if the sound is to be looped over and over. More on this later.
The Play/Pause Button
The heart of this database is the Play/Pause button. Here’s all of the code associated with this button.
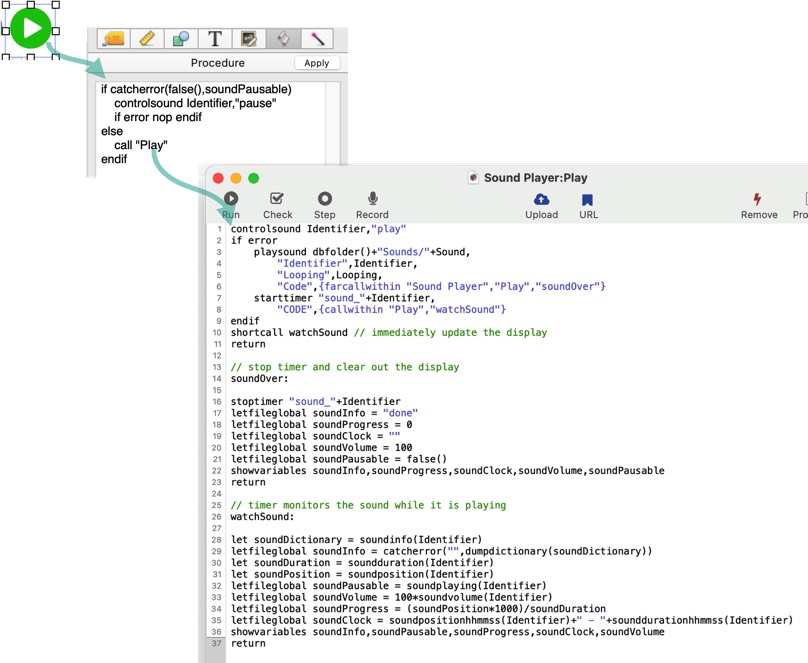
When the button is clicked, the code first checks to see if the sound is currently playing. If it is, the controlsound statement is used to pause the playback. (The soundPausable variable will be discussed further below.) The if error is just in case the sound has stopped playing.
if catcherror(false(),soundPausable)
    controlsound Identifier,"pause"
    if error nop endif
If the sound isn’t already playing, the Play procedure is called. This code starts by trying to resume playback if it has been paused.
controlsound Identifier,"play"
If the sound hasn’t already started playing, trying to resume will cause an error. In that case, the code starts the sound playback. It gets the identifier and sound file name from the database.
if error
    playsound dbfolder()+"Sounds/"+Sound,
        "Identifier",Identifier,
        "Looping",Looping,
        "Code",{farcallwithin "Sound Player","Play","soundOver"}
endif
Monitoring Playback
In addition to starting the playback, the code also starts a timer that will monitor the progress of the playback once per second.
    starttimer "sound_"+Identifier,
        "CODE",{callwithin "Play","watchSound"}
In this case the actual timer code is at the bottom of the same procedure. This code runs once per second, and uses the soundinfo(, soundduration(, soundposition(, soundplaying( and soundvolume( functions to set variables based on the current status of the sound.
// timer monitors the sound while it is playing
watchSound:

let soundDictionary = soundinfo(Identifier)
letfileglobal soundInfo = catcherror("",dumpdictionary(soundDictionary))
let soundDuration = soundduration(Identifier)
let soundPosition = soundposition(Identifier)
letfileglobal soundPausable = soundplaying(Identifier)
letfileglobal soundVolume = 100*soundvolume(Identifier)
letfileglobal soundProgress = (soundPosition*1000)/soundDuration
letfileglobal soundClock = soundpositionhhmmss(Identifier)+" - "+sounddurationhhmmss(Identifier)
showvariables soundInfo,soundPausable,soundProgress,soundClock,soundVolume
return
These variables are displayed on the form:
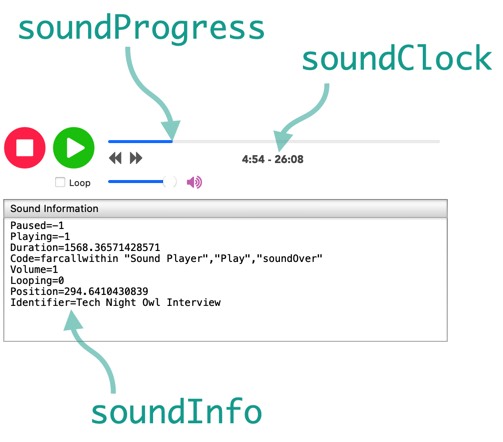
This timer code also creates the soundPausable variable that was used earlier to determine whether the sound is currently playing or not.
Stopping Playback
When the sound finishes, or is stopped, the soundOver code is run (this was set up by the playsound statement, see the code above). This code stops the timer, and clears all of the variables so that the display shows that the sound isn’t playing.
// stop timer and clear out the display
soundOver:

stoptimer "sound_"+Identifier
letfileglobal soundInfo = "done"
letfileglobal soundProgress = 0
letfileglobal soundClock = ""
letfileglobal soundVolume = 100
letfileglobal soundPausable = false()
showvariables soundInfo,soundProgress,soundClock,soundVolume,soundPausable
return
Dynamically Changing the Stop and Play/Pause Buttons
The appearance of the Stop and Play/Pause buttons changes depending on the state of the sound playback. These buttons were created using Font Awesome Icons, with formulas that change the button appearance based on the soundPlayback and soundPausable variables.
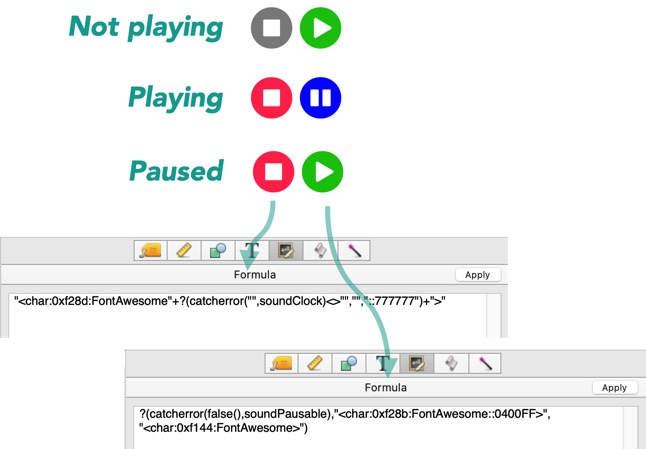
As the timer runs and updates these variables, the buttons will change to reflect the playback status.
Skipping Forward and Backward
The form has buttons that cause the playback to skip forward or backwards, in this case by 10 seconds.
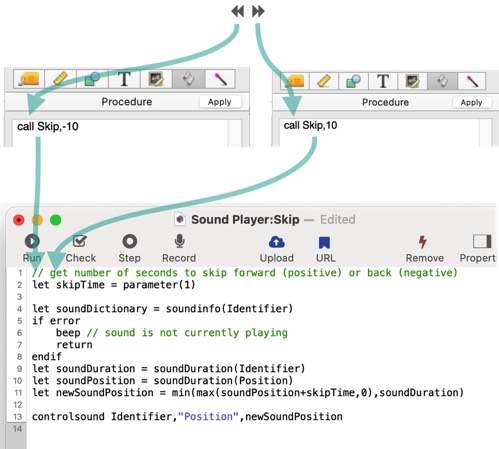
The code finds out the current position, calculates the new position, then uses the controlsound statement to change the actual playback position.
// get number of seconds to skip forward (positive) or back (negative)
let skipTime = parameter(1)

let soundDictionary = soundinfo(Identifier)
if error
    beep // sound is not currently playing
    return
endif
let soundDuration = soundDuration(Identifier)
let soundPosition = soundDuration(Position)
let newSoundPosition = min(max(soundPosition+skipTime,0),soundDuration)

controlsound Identifier,"Position",newSoundPosition
Jumping to a Specific Position
The form uses a Progress Indicator object to display the progress of the playback. You can also click on the indicator to jump directly to a specific spot.
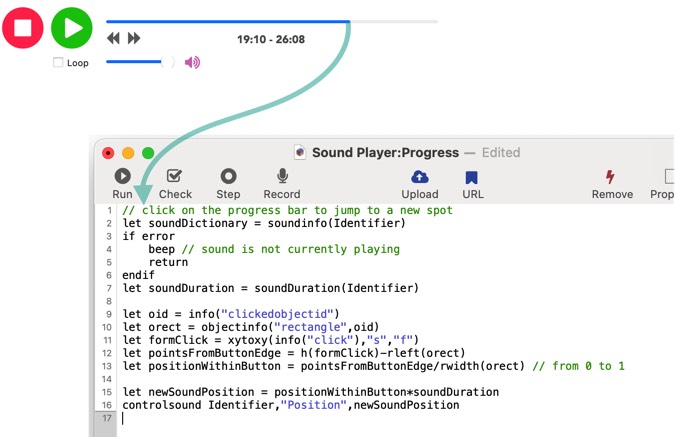
The code starts by figuring out where within the indicator the mouse was clicked, then figures out what the corresponding position in the sound is and jumps to it.
// click on the progress bar to jump to a new spot
let soundDictionary = soundinfo(Identifier)
if error
    beep // sound is not currently playing
    return
endif
let soundDuration = soundDuration(Identifier)

let oid = info("clickedobjectid")
let orect = objectinfo("rectangle",oid)
let formClick = xytoxy(info("click"),"s","f")
let pointsFromButtonEdge = h(formClick)-rleft(orect)
let positionWithinButton = pointsFromButtonEdge/rwidth(orect) // from 0 to 1

let newSoundPosition = positionWithinButton*soundDuration
controlsound Identifier,"Position",newSoundPosition
You can also do this with a Slider object. In that case the code is simpler, but it doesn’t really look like a typical audio progress indicator. Here is the code for a Slider object, assuming that the slider is directly linked to the soundProgress variable.
// jump to a new spot (from Slider Button)
let soundDictionary = soundinfo(Identifier)
if error
    beep
    return
endif
let soundDuration = soundDuration(Identifier)
let newSoundPosition = (val(soundProgress)/1000)*soundDuration
controlsound Identifier,"Position",newSoundPosition
Volume Control
The volume control is easy, just link the slider to this code:
let newSoundVolume = val(soundVolume)/100
controlsound Identifier,"Volume",newSoundVolume
Loopback Control
There’s no extra code for the Loop checkbox, it is simply linked to the Looping field with an on value of YES. If checked, the sound will loop over and over until the stop button is pressed. (Note: The looping option is only applied when the Play/Pause button is pressed, you can’t turn it on or off after the sound has already started playing.)
Further Concepts
This simple example is just a starting point. For example, you could add bookmarks within a sound to jump right to a specific spot. Hopefully your imagination will be unleashed to create amazing audio applications with Panorama.
See Also
- controlsound -- controls playback of a sound file.
- info("sounds") -- returns a carriage return delimited list of all currently playing sounds.
- soundduration( -- returns the duration (in seconds) of the specified playing sound.
- sounddurationhhmmss( -- returns the duration (in hours:minutes:seconds) of the specified playing sound.
- soundinfo( -- returns a dictionary that contains all of the properties of a sound.
- soundplaying( -- returns true if the specified sound is currently playing, false if it is paused or not playing at all.
- soundposition( -- returns the current playback position (in seconds) of the specified playing sound.
- soundpositionhhmmss( -- returns the current playback position (in hours:minutes:seconds) of the specified playing sound.
- soundprogress( -- returns the progress of the played sound from 0 to 1.
- soundstatus( -- returns the status of the specified sound: stopped, playing or paused.
- soundvolume( -- returns the current volume of the specified playing sound.
History
| Version | Status | Notes |
| 10.2 | New | New in this version. |