If you have a computer already running Panorama X, you can get Panorama X Team Server running in less than a minute. If Panorama X isn’t already running, launch it, then open the Preferences window from the PanoramaX menu. Then switch to the Advanced panel. You’ll notice that this panel contains a padlock that must be unlocked to access the Panorama Server preferences.
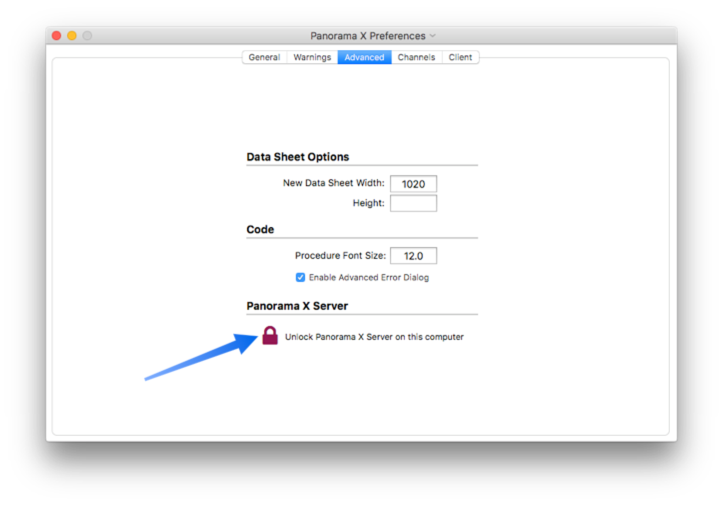
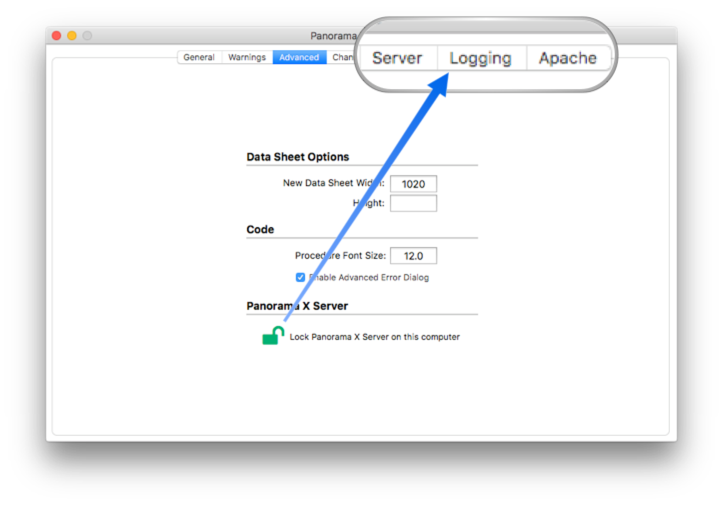
When you unlock this padlock, additional controls appear that allow you to launch and configure Panorama X Team Server.
The Server panel contains the primary configuration for Panorama X Team Server.
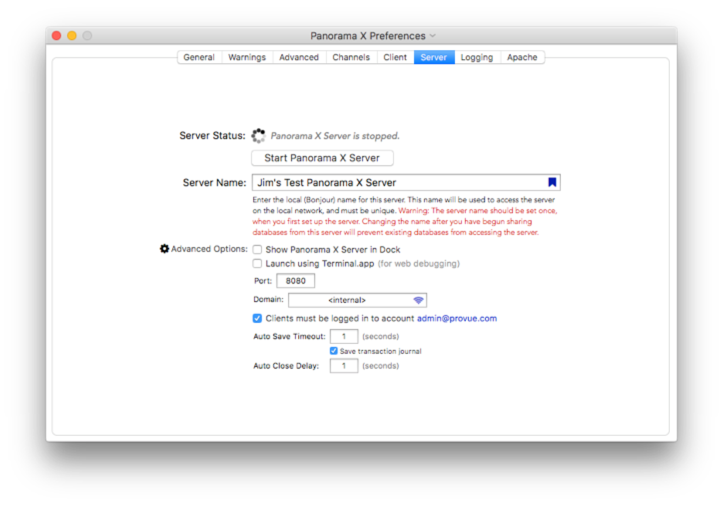
For most applications, all you have to do is specify the Server Name and press the Start Panorama Server button.
Server Name
The Server Name is used to uniquely identify a particular Panorama X Server. The name of the server is embedded into every database uploaded to that server, and is used to establish the connection between the client and the server. You can change the name at any time, but if you do, databases uploaded with the old name will no longer connect to the server. So we recommend that you set up the name once at the start and then leave it alone after that.
By default, Panorama uses the name of the computer as the basis for the server name. For example if the computer name is Bob’s Mac Mini, the Panorama X Team Server name will be Bob’s Panorama X Server. But you can edit the name to whatever you like. It doesn’t have to include a name or the word Server, for example, server names of Payroll Department or Western Region are just fine.
If you are planning to share databases on the internet, however, you should probably avoid generic names like Server or Payroll. This also applies if you are planning to have more than one Panorama Server on your local network. Any client computer can connect to only one Panorama server with a given name. For example suppose several departments in your organization that have servers simply called Panorama Server. These servers could be accessed by anyone in the company over the internet, but a given person will only be able to access one of them. For example, the company president would have to choose whether he wanted to access the payroll, research, or human resources server, because he couldn’t access all of them without reconfiguring his system. If the servers each have unique names then he can access all of them simultaneously.
Starting the Server
To actually start the Panorama X Team Server on this computer, simply press the Start Panorama X Server Button.

If this is the first time the server has been started on this computer, there will be a ten to fifteen second delay as the server software is installed.

When the installation process is complete, the server version and status is displayed, and the Start button changes into a Stop button.

That’s all there is to it! The server is now ready to use with clients on the local network.
By the way, you’ll notice that Panorama X Team Server doesn’t have any open windows and doesn’t appear in the Dock. This is normal. It simply runs in the background coordinating data flow between the Panorama databases on different computers (and optionally serves web pages as well). You never directly interact with the server, only through the Preferences panels and through the Server Administration wizard.
Checking the Server
To verify that the server is running correctly, open the Server Administration window from the PanoramaX menu. You should see the server listed. (If you don’t see it, make sure the Include Bonjour Servers option is checked.)
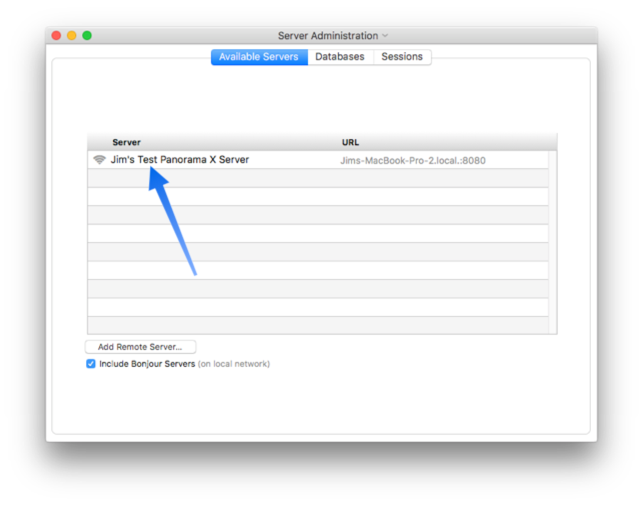
To verify that the server is responding to requests, double click on the radio wave icon. The server will respond with the current date and time.

You should be able to repeat this test on any computer connected to the same network.
Shutting Down the Server
If you need to shut down the server, simply press the Stop Panorama X Server button. After a short delay the Panorama X Server application will quit. (Note: If there are one or more databases open on the server, you will be asked to confirm before the server shuts down. Keep in mind, however, that this will disconnect all users that are currently sharing databases on this server, and may cause a loss of data.)
Launching the Server Manually
We recommend launching Panorama X Server thru the Preferences panel, as described above. But once it has been launched once this way, you can also launch it manually from the Finder. To do that, open the folder Application Support/PanoramaX/Server inside your Library folder.
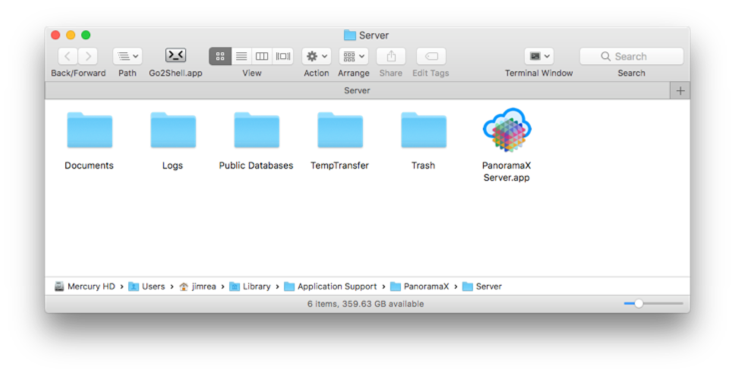
A quick way to open this folder is to open a new Finder window, choose Go to Folder from the Go menu, then enter
~/Library/Application Support/PanoramaX/Server/
Launching the Server Automatically when the Computer Starts Up
You may want Panorama X Server to launch automatically when the computer starts up. For example, this will allow it to restart automatically after a power failure.
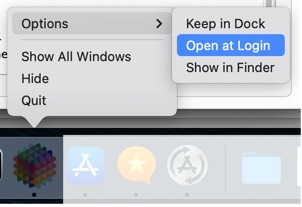
There are two ways you can configure Panorama X Server to start up automatically. If you have the icon set to display on the Dock, even temporarily, right-click on the icon to open the contextual menu and go to Options>Open at Login.
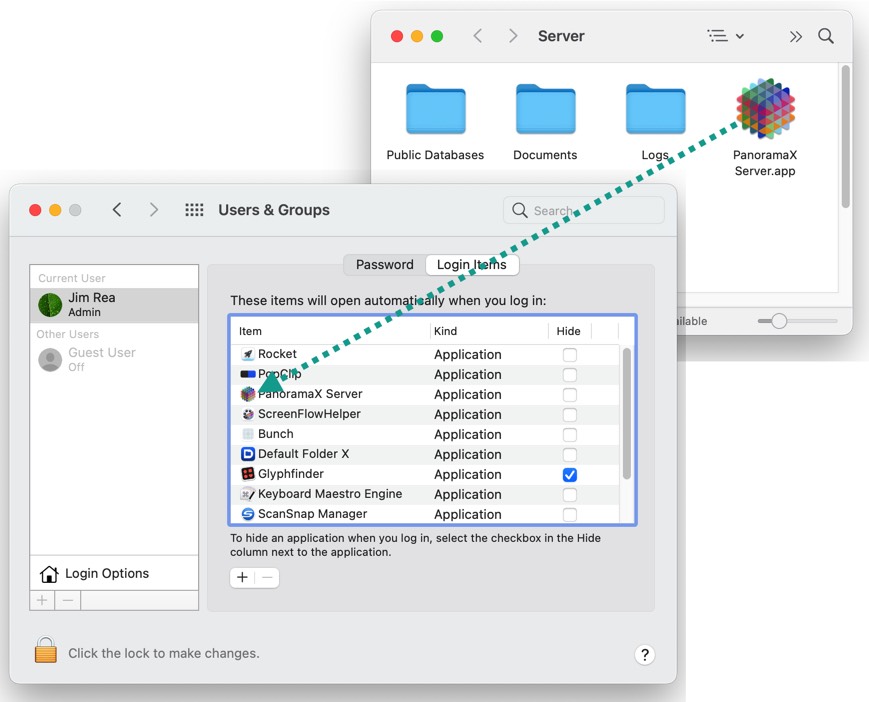
The second method is to drag the Panorama X Server icon from ~/Library/Application Support/PanoramaX/Server/ to the Login Items panel of the primary user account in the Users & Groups panel in System Preferences.
Relaunching the Server Automatically
In our imperfect world, sometimes software stops running unexpectedly (i.e. crashes). If Panorama X Server stops running, your clients won’t be able access the services provided by the server. This can’t be prevented completely, but Panorama can mitigate this by automatically relaunching the server after it stops.
To enable this feature, check the Automatic Relaunch option before you start up the server.

When this option is enabled, Panorama will start a robot that continuously monitors the server software to make sure it is still running. If the robot detects that the server software has stopped running, the robot will automatically relaunch the server. This will cause an interruption in service, but it will be brief.
When the robot is enabled, you can’t quit Panorama if the server is currently running. Actually you can, but it will quickly relaunch and resume monitoring. In other words, the “main” copy of Panorama monitors the server to make sure it keeps running, but the server also monitors the “main” copy to make sure that it keeps running. (If something causes both to crash at the same time, there won’t be an automatic recovery, but that is unlikely.)
Since you can’t quit the “main” copy of Panorama when this option is enabled, this option is generally not suitable when you intend to actually use the primary copy of Panorama to do work. But this option is ideal for situations where the server is running on a dedicated computer.
Note: When the Automatic Relaunch option is enabled, you can still make Panorama X Server automatically launch after a power failure, as described in the previous situation. If you’ve done that, Panorama X Server will first launch after the power failure, then a short time later it will automatically launch the primary copy of Panorama and start monitoring. You don’t need to do anything special to launch the primary copy of Panorama, that will be taken care of automatically.
Important: You cannot use the Launch using Terminal.app option when the Automatic Relaunch option is used. If you enabled Automatic Relaunch, the Launch using Terminal.app option will automatically be turned off for you. If Panorama X Server is already running using the server, you should stop and relaunch the server.
Relaunch Options: Server Check Interval
When automatic relaunch is enabled, Panorama normally checks the status of the server every 20 seconds. You can change this interval by clicking on the clock icon and choosing Server Check Interval from the pop-up menu.

Enter the new check interval, then press the OK button. For example, if you wanted to check the server once per minute, set the interval to 60.
Relaunch Options: Reboot after NN Failed Connections
At each check interval (see previous section), Panorama first checks the computer activity list to make sure that Panorama X Server is still running (i.e. it hasn’t quit or crashed). If it isn’t running, it will immediately relaunch it.
It’s possible that Panorama X Server could be running but not responding properly, i.e. “hung” or “frozen”. To check for this, Panorama will send a status request to the server (it uses the checkserverconnection( function to do this). If it doesn’t receive a response, the server may be frozen. However, the server might just be a bit busy, so instead of immediately killing and relaunching the server, the automatic relaunch robot waits until there have been several failed status requests in a row. By default it won’t kill and relaunch the server until there have been 5 failed requests, but you can adjust this to a higher or lower value. If you use a lower value, the server will resume operation sooner, but this might cause “false” relaunches that weren’t actually necessary. Using a higher value reduces the chance of “false” relaunches, but means that if the server is frozen, it will take longer for it to be relaunched.
For example, with the default check interval of 20 seconds and the default of waiting for 5 failed requests, it take 100 seconds to relaunch if the server is hung. If you change the interval to 10 seconds and make the threshold 3 failed requests, a relaunch will be forced after only 30 seconds.
To change the number of failed connections that will trigger a relaunch, click on the clock icon and choose Reboot after N connections from the pop-up menu.

If you don’t want Panorama to check whether Panorama X Server is hung/frozen, set the threshold to zero. This prevents Panorama from sending status requests to the server. With this option set to zero the robot will still automatically relaunch the server if the server quits or crashes, but not if the server is hung or frozen.
Relaunch Options: Check Connection Timeout
The previous section described how the automatic relaunch robot sends a status request to the server on a periodic basis. To customize how long the robot will wait for the server to respond to this request, click on the clock icon and choose Check Connection Timeout from the pop-up menu.

If the server doesn’t respond to a request within the alloted time the request will be chalked up as a failure. If there are several failed requests in a row, the robot will automatically force Panorama X Server to quit and relaunch it.
Relaunch Options: Reset to Factory Defaults
To reset all of the relaunch options to their factory defaults, click on the clock icon and choose Reset to factory defaults from the popup menu.
Server Relaunch Logging
The automatic relaunch robot normally is completely invisible and silent. But if it encounters a connection failure and/or needs to relaunch Panorama X Server, it will record that failure/relaunch in the server error logs (See Logging Server Activity). The failure will be recorded in both the Sharing and Web Error Logs.
If the server is actually relaunched, the log entry will show the last request the server received while it was still working. If the server stopped working because of a problem with your web publishing code, the log entry can help you track down the source of the problem.
Monitoring the Server
If you are the administrator of a server, you probably would like to be aware of server problems before they are reported to you by a user or a member of the public. A good way to do that is with an external web monitoring service. Here at ProVUE we use https://uptimerobot.com for this, but there are many monitoring services available, both free and paid. The basic concept is that the monitoring service periodically sends a message to your server and checks to make sure it receives the correct response. If the response is incorrect, you are notified so that you can correct the situation as soon as possible. The notification can be in the form of an email, a tweet, a Slack message, a text message, or even an automated phone call (text messages and phone calls usually require a paid service).
Panorama X Server includes a built in jsonstatus url that is designed for use with a monitoring service. This status information can be accessed with a URL like this:
http://yourserverurl.com/cgi-bin/panoramax.cgi?jsonstatus
The information is returned in the form of a JSON dictionary.
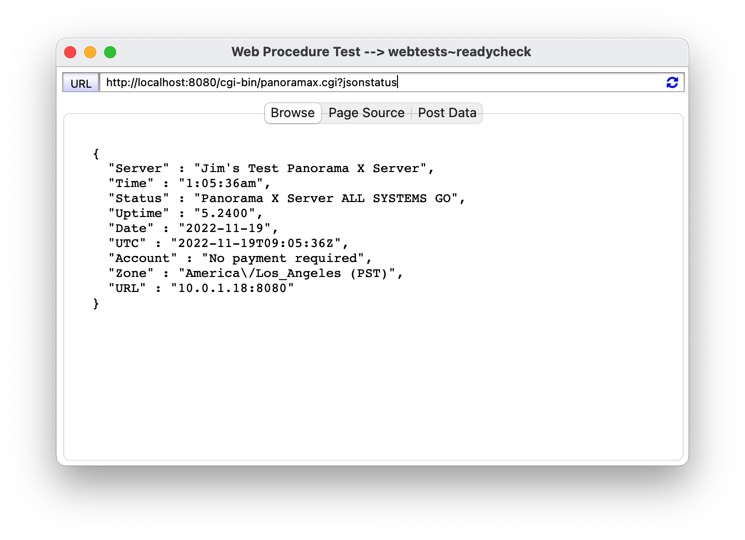
If the server is running properly, this response will contain the text:
"Status" : "Panorama X Server ALL SYSTEMS GO"
Most monitoring services can check for the presence of specific text in the response, for example UptimeRobot calls this keyword monitoring. You should set up your monitor so that you are notified if the all systems go text is missing from the response. You’ll be notified if:
- Your server computer goes down.
- Your server computer loses its internet connection.
- The Panorama X Server application quits unexpectedly.
- Your Panorama account needs a payment.
In the case of needing a payment, you’ll be notified as soon as Panorama can determine that your next account balance statement will show a zero or negative balance. This may be anywhere from 0 to 30 days before the statement is actually issued, giving you advance warning that account needs to be replenished. See the next section for more detailed information about managing your account balance.
If you need to be notified of additional possible problems, you can set up your own custom monitoring URL. See the serverstatus( function to learn how this can be done.
Note: You can only use a monitoring service if your server has a public IP address. If your server is only available on your local network, monitoring services will not work.
Managing Your Panorama X Account
You must maintain a positive balance on your Panorama X account (see Managing Your Panorama X Account) to use Panorama X Server. If the balance falls below zero, the server will stop running (with a short grace period for web publishing, see below). Once a month you’ll receive an email that shows your account balance and usage information for the previous month. You can also check the account balance from the Payments panel of the Site License window. The account balance is shown at the top of the window, but you can also click the Current Account Usage button to display a breakdown of the current balance, the usage so far during this period, and the projected balance at the end of the next period. The projected balance is calculated based on the actual usage so far during the period - the actual balance at the end of the period may be lower dpending on the actual usage.
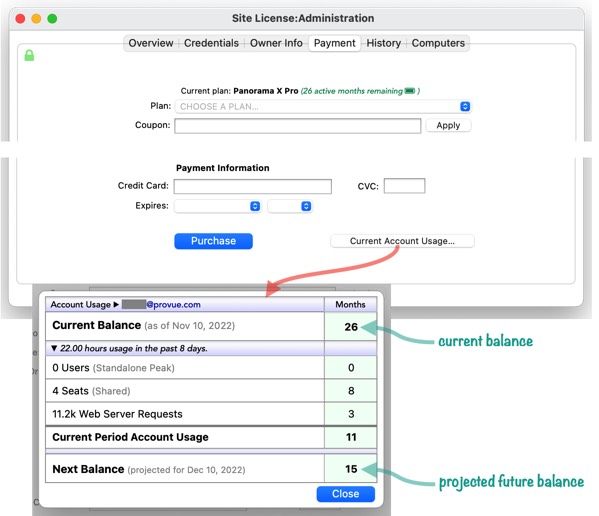
Here’s what you’ll see if the projected balance is zero or negative.

If you see a zero or negative projected balance, be sure to make a payment before the specified date. This will ensure uninterrupted operation of the server.
Monitoring the Account Payment Status
You can also use the built in jsonstatus url (see Monitoring the Server above) to check the payment status, including whether a grace period is in effect. The Account item in the status JSON indicates what the payment status is of the Panorama X Account. There are four possible options:
- No payment required – The account has a positive balance, no action is required.
- Payment due soon – The account has a positive balance. However, based on recorded usage accumulated since the last statement, the balance will go to zero or negative within the next 30 days.
- Payment due immediately (grace period) – The account has a zero or negative balance. Database sharing is disabled until a payment is made, but web publishing will continue to work. See Web Publishing Grace Period below.
- Payment due immediately – The account has a zero or negative balance, and the server is completely disabled until a payment is made (see the next section).
Making a Payment to Your Account
If the account balance does fall to zero or lower, the server will continue to run but will respond to all requests with an error indicating that the balance is low. To rectify this you’ll need to use the Site License window to make a payment (see Managing Your Panorama X Account). If you use the Site License window on the computer that is running the server, the server will start working immediately as soon as the payment is made.
If the payment is made on a different computer, it may take some time for the server to register that the payment has been made. To force the server to immediately register the payment, open Panorama X on that computer (if it is not already open) and then open the Server panel of the Preferences window. Then click on the battery indicator and choose Check Account Balance from the popup menu.
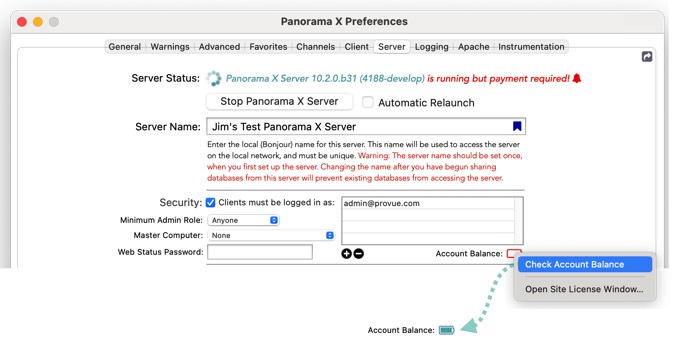
The indicator will change to show the current account balance, and the server will immediately begin operating normally again.
Web Publishing Grace Period
When the account balance falls to zero or below, your server will immediately stop responding to database sharing requests. As described above, you’ll need to make a payment to start sharing operation working again.
For web publishing, however, there is a 3-day grace period. During this grace period, the server will continue to operate normally. As long as you make a payment before the grace period is over, there will be no interuption in the operation of your server. This extra grace period is provided because a web server is usually available to the general public, not just to members of your organization. So this extra cushion is provided to help avoid any interuption of a public web server operated by Panorama X Server. We urge you to make a payment as soon as possible when you become aware that the balance is low – don’t try to wait until just before the end of the grace period (and note that waiting does not save any money – usage is still tracked during the grace period for future billing).
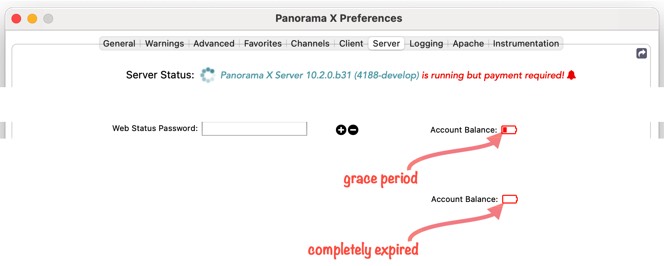
The grace period starts when your monthly statement is emailed to you. If your server is running, you can also check the Preferences>Server panel to see if the grace period is in effect. During the grace period, the battery will show almost, but not quite empty. Once the grace period has expired, the battery will be completely empty (and at that point, the server will respond with an error page to all web publishing requests).
You can also use the built in jsonstatus url to check the payment status, including whether a grace period is in effect. This status information can be accessed with a URL like this:
http://yourserverurl.com/cgi-bin/panoramax.cgi?jsonstatus
The information is returned in the form of a JSON dictionary that will look like this if a grace period is in effect:
{
  "Account" : "Payment due immediately (grace period)",
  "Server" : "Jim's Test Panorama X Server",
  "Time" : "7:23:08pm",
  "Status" : "Panorama X Server ALL SYSTEMS GO",
  "Uptime" : "23.5322",
  "Date" : "2022-11-19",
  "UTC" : "2022-11-20T03:23:08Z",
  "Zone" : "America\/Los_Angeles (PST)",
  "URL" : "10.0.1.18:8080"
}
See Also
- Advanced Server Settings -- Panorama X Server settings for advanced users.
- Client/Server Debug Instrumentation -- using instrumentation with Panorama X server and clients.
- Logging Server Activity -- recording server activities for later analysis.
- Restricting Server Access -- limiting Panorama X Server access to authorized users.
- Server Administration Wizard -- this wizard is used to monitor the operation of Panorama servers (both local and remote servers can be monitored), including monitoring server status, checking database status and downloading databases, and monitoring the status of user sessions.
- Setting up a Computer as a Panorama X Client -- instructions for setting up a new client computer so that it can access a Panorama X server.
- Using an External Web Server -- instructions for using Panorama Server in conjunction with an external web server (for example Apache, Nginx, etc.).
History
| Version | Status | Notes |
| 10.2 | New | New in this version. |